Day 2: The Reinforcements

What a weekend. We had our buddy Mark over again to lead the way in our kitchen renovation project.  Day 2 consisted primarily of adding reinforcement to our dining room flooring that was poorly constructed whenever the addition was put on (mid to late 70s perhaps, judging by the linoleum we found underneath). Scroll down to photo #3 to see how much the floor had sagged over the years. About 1.5 inches! Oops, I just gave you the answer, didn't I?

While I typed up the blog post this morning about our adventures Saturday, and got a jump start on some work for the week, the men had fun digging to China up the floor. At one moment I heard some cursing followed by a door slam, and later found out Evan had discovered a bumble bee's nest. These suckers were huge! A few hours later when the guys were off at Menards, I heard one buzzing around by the front door. I thanked him for visiting but was happy to send him on his way, and I may have muttered a few lines from Home Alone that started with "get your ugly, yeller, no-good-keaster off my property ..."

Here's my fearless husband in the thick of things:

We left the old supports in place, and attached new ones to them at the appropriate height. Here you can see the side that shows off the new wood (we had already added a layer of 3 mil poly below)


Sunken floor!

New puffy insulation to serve as a blanket under our floors and hopefully keep the Minnesota cold from creeping in. I thought it looked so pretty ... like a hay bale.

We double-layered the insulation. But you have to keep the layers thick and puffy because the warmth lies between the layers ... like winter socks. 

Nice golden color, eh?

Cover her up with another layer of 3 mil poly, and you've got yourself a sandwich! If you don't mind fiber glass ...

Top it off with a sheet of 5/8" plywood

Mark the studs with a line of chalk, then screw down with 2-3/4" torx screws

Caulk your joints and repeat the final layer so you have two sheets of plywood on top of each other (four total since we used two across).


I had my own adventure this afternoon driving Mark's big truck 30 miles to pick up our new flooring! All went well, but I think I got a few weird looks by passer-bys ... and there were quite a few people passing me as I didn't dare push it past 60 mph. 


Next up?
Prepping and laying our heated floor while preparing for laminate flooring installation.
Maybe some plumbing and electrical if we have time!

But before that, Evan has a 4am shift at the airport, where he'll be lugging 50 lb bags. Uffda.

To read about our first day of renovation, click here. For more info on our project and to see our intended floor plan, go here.

Kitchen Demo: Day 1

We're one day in to our big kitchen remodel project, and so far so good. The men did stumble across a bumble bee's nest in our dining room floor, but if that's the worst setback along the way, I'd say we're doing pretty good. I hit the road shortly after 10am for my aunt's 50th surprise party up on a lake just north of the cities. While I had a relaxing time chatting with cousins, taking boat rides, indulging in treats, and trying to get some good pictures of the kiddies ...


.... Evan and Mark (the handyman) were tearing up the kitchen. You'd be surprised how much a kitchen echos without cabinets and how much bigger the space appears. Here's some pictures to give you an idea of the transformation:

This is what you see when you walk in the front door:
There's going to be a window straight ahead on that wall! If you look carefully you can make out the pencil drawing someone sketched. Can't wait to show the before, progress, and after pics of this shot! (To see our layout plan, check out this post)

A full kitchen shot, looking back at the door you just walked through. The cabinets were on there pretty good, so we'll probably have to sheet rock that wall again or else do some major patching:


And the dining room/addition. They worked down to the floorboard and discovered that yes, we'll have to add some more support. There is a definite slope/sinking as you walk out onto the addition, and when E and Mark both stood on those floor boards, they were spongy and sagged even more. Although it's tempting to find a quick (and cheap) alternative, we're going to do the right thing and fix the underlying problem. I think that's the goal for today, actually. 

Here's a close-up of the flooring we found underneath!


Here's the sight right when you walk in the door. Quite the convenient spot for the fridge, don't ya think? I hooked up our microwave, so we can heat up a sweet potato, leftovers, oatmeal or whatever. We moved most of our frequently used dishes to that small white buffet so it'll be easier to live sans kitchen for a while (not sure how long we'll be in this setup!). Oh, and in case you're wondering, we're washing our dishes in the bathroom sink and tub.

Today: reinforce dining room floor (this is pretty much an all-day affair)
I am headed to Lumber Liquidators with Mark's truck later this afternoon to pick up the flooring.

I'll try and update daily, so check back again soon!

To read more about our plan for the kitchen and why we decided to renovate now, read this post.


T-3 Days Til Demo!

You heard that right. E and I got crazy hair and decided we should take advantage of his summer off (thanks teacher career) and go for it! We've been talking about it for such a long time and carefully preparing ourselves for that final leap, even trying to think ahead to the days when we'll be sans cabinets for a while - that's one of the reasons why we added our recent banquette, to provide some extra storage in case this project turned into a full-summer affair. (I need to add updated photos of the banquette. We now have curtains, knobs, and a bench cushion!)

Queue leaky sink. This spring our sink decided, after 60 years of cooperating and sticking to the path in the pipes, it would make it's own trail and send us flying for buckets and tupperware every time we ran the dishwasher. We know you can fix a leaky sink, but we were hoping to move its location when we finally decided to remodel, so a repair would deter us form that end goal. Oh, and in case you haven't been privy to our lovely dishwasher situation, it's portable, so every time we run it we wheel it over to the sink and hook it up to the faucet, and then are forced to stay clear for a few hours since said dishwasher squats in the middle of the kitchen - a barricade that makes any food prepping a challenge. Needless to say, the added challenge of emptying buckets halfway through a cycle just might be the final straw ...


Enter Mark Mann. We started doing some research on kitchen renovations, and after a few estimates quickly learned that a full kitchen remodel wasn't exactly in the budget. And besides, we're more the do-it-yourself type anyway. Then Evan came across Mark Mann from Mann Made Handyman Services, who offered us a great deal where Evan (and myself when I'm not working) will put in our own sweat and blood (hopefully not too much blood) for exchange for a completely affordable kitchen.
Add a sale at lumber liquidators and the discovery of a farmhouse sink within our budget, and we're sold!

Good thing we've been dreaming up this kitchen for a while, because demo day is scheduled for Saturday.

This Saturday!?!

I'm thrilled and excited but now we have to act fast. This past week we researched flooring, cabinets, and countertops, and finally are making some decisions. Mark helped us set up a budget and brainstorm  kitchen layouts and how to solve our sinking floor between the house and addition. We spent last Friday night donning our architect hats and playing around with Ikea's floor planner software, this afternoon Evan ordered our flooring, and this evening we stopped by Ikea and bought our first two cabinets (we'll purchase them in shifts since they can't all fit in the car and we have to assemble them anyway).

But on to the exciting part. Here's our lovely BEFORE photos. I never remember to take these pictures, so I made a point this time of snapping a few before too many cabinets come down (you'll notice one uppers is already bare). I didn't bother to clean up first, so you'll notice some cream cheese and crackers, my "appetizer" in some of these, and some pesto later on - dinner! Oh, and some muffin tins sudsing in the sink ... kinda grimy. But that's the point right? These are the no-frills photos. The grumpy, unsmiling, before-the-diet portrait shots, if you will.

This is taken from the entrance to the kitchen. 

The entrance to the kitchen is off to the right there, by the odd half-cabinet.

This is taken from out by the dining room table, looking back at the kitchen. I'm sad the cabinets we added above the fridge and stove will have to come down, but we've decided to either Craigslist them or find another use in the basement. You live, you learn, right? At least our work running an electrical line up to the microwave will remain.

This is again, near the entrance to the kitchen. Not sure what's going to happen on that far wall yet ... it might not change much for now. But I thought I should take a picture anyway to round out the story. I'm kind of obsessively thorough like that ; )

And here's our tentative plan! The white cabinets from Ikea don't look that white in the pics below. And the pantry added to the far wall isn't in the plans right now. The cabinet on top of the fridge will be deeper (standard fridge depth), and we're not sure what'll happen to the right of the fridge (I don't think the kitchen cart really fits there). The new dishwasher will go directly to the left of the sink, but we might not opt for the panel covering it (you have to get a higher-end dishwasher for that to work). And we're planning on carrying out the countertop a bit and wrapping it around the back side, we just didn't know how to illustrate that.

But my favorite part?

The window!


And here are some of the floor samples we were considering. Left is a cork floor - we wish we could've done this, but the laminate (middle and right) was SO much cheaper and still a durable product, so we had to pass the cork by. Although I love how dark that middle sample is, it was hard to visualize in our space, and would be harder to match with the rest of the hardwood floors in our house.
So we decided on the sample on the right!
Toasted Chickory from Lumber Liquidators, on sale for $1.99/sq ft.

We aren't decided completely on the countertop, but will likely go granite, and this is one of my favorites:
Bianco Antico granite - from TBD (sold many places)
You can see it in a kitchen here.


The next few days will be filled with assembling Ikea cabinets, boxing away dishes, moving the fridge to the living room, and planning meals for the next week or two sans kitchen. Anyone wanna invite us over for dinner? : )


Pancakes with the Sisters

If you've been wondering why it's been a little quiet over here as of late, it's because I've been busy over on our new sisters blog!

Go check out my newest post about Saturday Morning Pancakes! (recipes included!)


Home-improvement update: I think we have a problem on our hands. Our sink is leaking, majorly. Let's just say someone has the kitchen-renovation bug!

Kitchen Renovation Begins!

We left off our last house-related post with a tease regarding our Super-Bowl Project this year. I realize the photo clues weren't all that misleading, so you probably - and quite accurately - guessed that we were up to a little above-the-stove cabinet installation!


If you've been to our house, you have surely noticed the blank wall above our stove, and the general lack of functional space in our tiny kitchen. Not that this has kept us from enjoying some tasty meals, having company over, and even hosting Thanksgiving, but it sure would be easier to get that turkey in the oven without the oddly placed counter jutting out into the middle of the room!

Our kitchen is one of the rooms in our house begging for updates the most (hello original 50s linoleum yellow counters, angled cabinet and counter crowding the entrance, cabinets that bless our dishes with a fine coating of saw-dust on a regular basis, and a portable dishwasher that takes up the entire kitchen when plugged into the sink ... you get the picture). But, for some reason we haven't done much besides purchase new appliances, replace the overhead light, and thread some make-shift under-cabinet lighting. Well okay, I know why we haven't jumped into gutting our kitchen and picking out dream countertops. $$$$. Kitchen renovations are known for their pocket-book-draining capabilities, and that's something we frugal homeowners can't quite come to terms with. So what do we do? We improvise, take it slow, and don all sorts of hats to get the job done ourselves.

One Friday evening in February, Evan played the role of electrician!


Don't worry, the power to the entire house was turned off, if that makes you feel better ; )  The task at hand? Installing a new microwave we scored at BestBuy for $100 (and then they discounted us an additional $10 for a little mix-up in the delivery process). We were definitely tempted by the sleek stainless steel models, but our stove is already white, so we thought it best to keep everything cohesive. And white is always cheeper, especially when you select last year's model!

Evan lay a new electrical line with his dad in our basement a while back, so he was already familiar with the basic steps. But this would be a little more challenging as we needed to run the line from the box in the corner of the basement, run it along the basement rafters, drill a hole in the basement ceiling (we have an unfinished basement, thankfully, which made this project much easier), and thread the wire up to where we wanted to plug in our new microwave!

Easier said than done. We were lucky in the drilling process and our measurement estimates, and thankfully drilled our hole from the floorboards in the basement up into the wall - not the floor itself. This is what we were aiming for. But then the real challenge was getting said wire UP to where we wanted it on the wall. Wouldn't be so hard if some former owner/renovator hadn't stuffed insulation down there, even though it's an inside wall! Yea, bendy wire doesn't cooperate when trying to feed it through thick insulation. Let's just say that a certain wife was found threading a piece of pliable wood trim down there, with a wooded spoon attached to the end at one point in the process. We just wanted to make contact between the two holes at this point, and would worry about getting the wire in there later. Well, poor spoon didn't quite make it. He served up many a spaghetti dinner, but found his final resting place in the wall. tear.


But not to fear, in our desperation to string a path in our wall, we tried multiple techniques and finally strung the wire itself up from the basement -- and it worked! Hallelujah. Someone was getting a little grumpy his project wasn't going so well.


The next steps were easy: add the outlet box, connect the wires, and set the plate in place (all things Evan has done before). We were thrilled when we finally got the orange lights of approval from our handy dandy outlet-testing tool.


But this project wasn't nearly finished (when are they ever, really?). So Evan strapped on his workman's belt, literally:


And we hung our first cabinet!


You will notice we hung it a few inches down from the ceiling. This is to accommodate for some moulding to go along the ceiling, as per the style in the rest of our kitchen. It also let us hang the microwave at an almost-ideal height.

Yes, our microwave is a little high, but when you only have so many options for cabinet sizes (we got the stock shelves, unfinished at BMO). It should go nicely with our unusually tall shower head!

Microwave installation directions were quite simple to follow with the template you just tape to the wall.


You mount a large metal bracket, then sort of clip it in place (and there's a few other steps).


I'd say the most strenuous part of the project was getting the little cabinet installed above the fridge. I may have spent a good hour or so crouched on top of the fridge in all sorts of positions to keep the cabinet in place while Evan drilled and got her set. I learned your head can prove as an additional hand,  when need be!


We know it looks a bit awkward having space under the fridge cabinet, but we have a duct going up there that we didn't want to move. Oh, and you can see in the photo above what we mean by our beyond-awkward cabinet jutting out towards the stove. Can't wait to fix that someday! We will likely end up painting the cabinets, but have to wait until we decide on the rest of the kitchen ... and that'll be a huge project!

Do you have any tips on renovating a kitchen on a budge or by yourself? We know it is quite the undertaking so would love to hear your secrets!

Introducing our new Sisters Blog!

Happy Saturday everyone!

I have some house updates to show you, but while I type that up and work on the pictures, I wanted to share with you a new blog you might like.

As many of you know, I am blessed with three wonderful sisters. We are pretty close in age - about six years total (and I'm only 13 months younger than the first!). Since we're spread across the country, we don't actually all get together more than once or twice a year. : (  But that is no reason why we still can't be CLOSE. I think my family has mastered the long-distance family relationship, if I do say so myself! My parents are both originally from western South Dakota, but they raised us girls out east (NYC for a bit then good ol' NJ). Every summer we'd trek out west, usually in a horse-drawn buggy on a four-day road trip, to spend weeks with both sets of grandparents and cousins, so the long distance thing has been ingrained in us since we were little. You just have to make it work. Currently, my parents live in New Jersey, I'm in Minneapolis, Kirsten is in St. Louis, Karrin is in upstate New York, and Sarah is about 15 minutes from me - but will be off to Alaska in June. I think I call my mom at least once a day and one or two sisters or my dad every day as well. We are big on computer Video Chats and iPhone Face Timing, and we all make an effort to get together whenever we can.

When I was little, I often remarked to one of my grandparents, "I wish that we lived where we live and you lived where you live but there just wasn't so much land in between."

Isn't that the truth?

But since land cannot be pushed aside, lengthy interstates cannot be avoided, we must find ways to conquer this distance. And that's where a little thing called the internet (name that TV-show!) comes into play.


May I introduce to you FourSisiters - KCKS, our new sisters blog where we'll keep each other (and anyone else who cares to follow along) updated on the adventures of our life. From random thoughts and ideas to local restaurant reviews to house project to travel essays and beyond, this little blog will share our journey together as sisters living apart.

Check it out! Karrin already posted about her recent travels in Madagascar!

Notes for Someday

Here's a little something you didn't know about me:

I am a spy.

Well ok, not really. But I do carry a little notebook around with me so I can jot down quotes and ideas whenever I hear them. I once had a professor who recommended doing this because you never know what "golden nuggets" you'll want to remember for later -- and besides, it makes people wonder what you're up to ; )


I am a self-appointed observer of the world and I keep all my findings in my little notebook ... which has now extended onto random post-it notes and scraps of paper I corral in a plastic bag.


I learned the hard way to protect my thoughts in a plastic bag because you never know when a faulty water bottle top might leak, or when you'll get caught in the rain. Once I lost an entire notebook and felt lost for weeks until I managed to transfer those precious notes from memory into a new notebook.

Actually, I have a whole slew of notebooks. My collection began as a kid. I remember worrying about what to write in each of them because every one needed to have a purpose. I'd set them all up on the table, stare at them for probably half an hour, and then run my plan by my mom (who told me not to worry so much and just write!). I think I ended up with a dream journal, an everyday journal (where I literally wrote something down every single day ... talk about a yawn-er), a travel journal, and I'm sure I came up with some other purposes. I took my journaling seriously. After all, it wasn't only for me, I wrote for the whole world. Seriously, I imagined that someday the world would be destroyed and a few lone survivors would come across my journal, and that is all they would have as a clue to our former world. Yes, I really did imagine this. That's why I'd write down the entire date in the corner of the page and as many details as I could. I wanted to help those future earthlings out! They might be confused what 9/24/1993 meant, but they'd figure it out, thanks to my impeccable recording. And then my journals would be famous, wuahaha.

Here's my collection today:


My greatest inspirations usually come when I'm driving to work in the morning. I've read somewhere that morning is a natural creative time, and I definitely find this to be true. I'll be driving along listening to some music when all of a sudden an idea pops in my head -- and I have to wait until I arrive at work before I can quickly scribble it down in my notes (or sometimes I may use my hand as a notepad while sitting at a light!).

I never fully know what the future holds for these "golden nuggets". Sometimes it's just a scene or image I'd like to remember and maybe incorporate into a children's book someday, like a smokestack puffing pink cotton-candy into the setting sky, or a whole army of UPS trucks heading down the road in perfect unison that somehow remind me of an animated kid's movie. Other times I jot down more philosophical thoughts that usually revolve around the seasons or nature. And there's definitely a whole slew of blog-post ideas, poems, and childhood memories. I'll get back to them ...

 ....Someday....

I work almost full time at a publishing house, work as a freelance writer  for a local lifestyle magazine, I try squeeze in a run (or a Body Pump class!) almost every day, and have many other hobbies and house projects that keep me going. So if a few weeks go by without a peep from me on this ol' blog it isn't because I have nothing to say.

My thoughts are just germinating -- waiting for their turn in the ziplock bag.


Our Annual Super Bowl House Project

I don't know what it is about this time of year, but right around Super Bowl Sunday, E and I get a little stir-crazy and spontaneously start tackling the first larger house project that pops into our mind. We aren't in the mood for a little painting or some shelf hanging this time of year. No, we dive right in to rather intimidating tasks before we've really figured out where we're going. Two years ago our Super Bowl Sunday night ended with our bathroom floor looking like this:


But maybe that's the best way to do it? If we had known we'd be living with a sticky bathroom floor for a few weeks, where we had to slip our feet into the shoes stuck to the floor (they really were!) before sitting on the throne, we probably wouldn't have had the guts to get 'er done. Ignorance is bliss right? Plus, it's kind of an adventure as you figure it out one step at a time. And it's not like we hadn't thought about re-doing that bathroom from the moment we walked through the house - we just hadn't planned out the renovation stages, or what type of flooring we were going to lay, or whether we needed a new vanity (turns out we did).

Wait, you haven't heard this story before, have you? That's because I have neglected to share our bathroom renovation story on this here blog. Shame shame. How about I take this second-year anniversary to fill ya in ....

.... It was a dark and stormy night. No, it wasn't. The story really begins back in July of 2009 when we moved into our fixer-upper 1950s house. Most pressing project? Tackling the purple shower-less bathroom. This was our only bathroom, so getting that shower going was kind of a must. (We showered at the gym for weeks!) ...please ignore the farmer tan!

 First up: chipping away the flimsy plastic tile surrounding the tub. Easy peasy.

 Next: soliciting the help of my dad to get this bath turned into a shower. (Here he is removing the old plumbing from the tub.)

 Long story short short-ish: there were many obstacles along the way...

 Frustrations taken out on certain purple walls ...
(Yes, we had a window in the shower, yikes!)

Fun playing with water ...

 Late night playing with torches ...

 A little help from the pros (had this block-window installed) ...

 Walls uncovered and unusually tall showers put in ... 
(we didn't want to be discriminating against any tall house-guests we might have, naturally. Of course we don't currently know anyone over seven feet, but ya never know!)

 Heavy and dusty Wonder Board installed just by C & E
(Probably the most strenuous part of the project)

Someone donned his masonry hat and tiled our entire shower!


And by September, we finally had a new shower, complete with recessed shelf!

But that was just the beginning of this bathroom renovation.

Then came the big Super Bowl 2010 bathroom floor demolition, which soon afterwards left someone out on the curb:

Evan's dad helped us patch that up. We laid some plywood, spackled around the nails to make a perfectly smooth surface to lay our new flooring.

There was some father-son time out on the front lawn as they discussed the logistics of cutting our floor to size.

As usual, they made wise decisions that resulted in ...

A finished bathroom!

Errr ... never mind. No project is ever done. I don't quite remember what the problem was here. I think our tub/shower was leaking? Whatever it was, E wasn't happy. (But he got it fixed anyway.)

Although we had decided to replace our vanity during the re-haul due to moldy wood on the base (and because it was just so out of date), we kept our medicine cabinet for a while, trying to decide what to replace it with. But removing the mirror revealed some crazy wires!

Thankfully pops Pierson knew what to do (that's him on the phone, while E donned his headlamp ... not sure why we decided to tackle this project at night!)

After some wire wrangling ...


 We had a mirror and new light-fixture installed!

And here's the bathroom today!
(that little white shelf has to go, by the way. It's drawn blood from the scalps of far too many people to be considered bathroom-friendly)


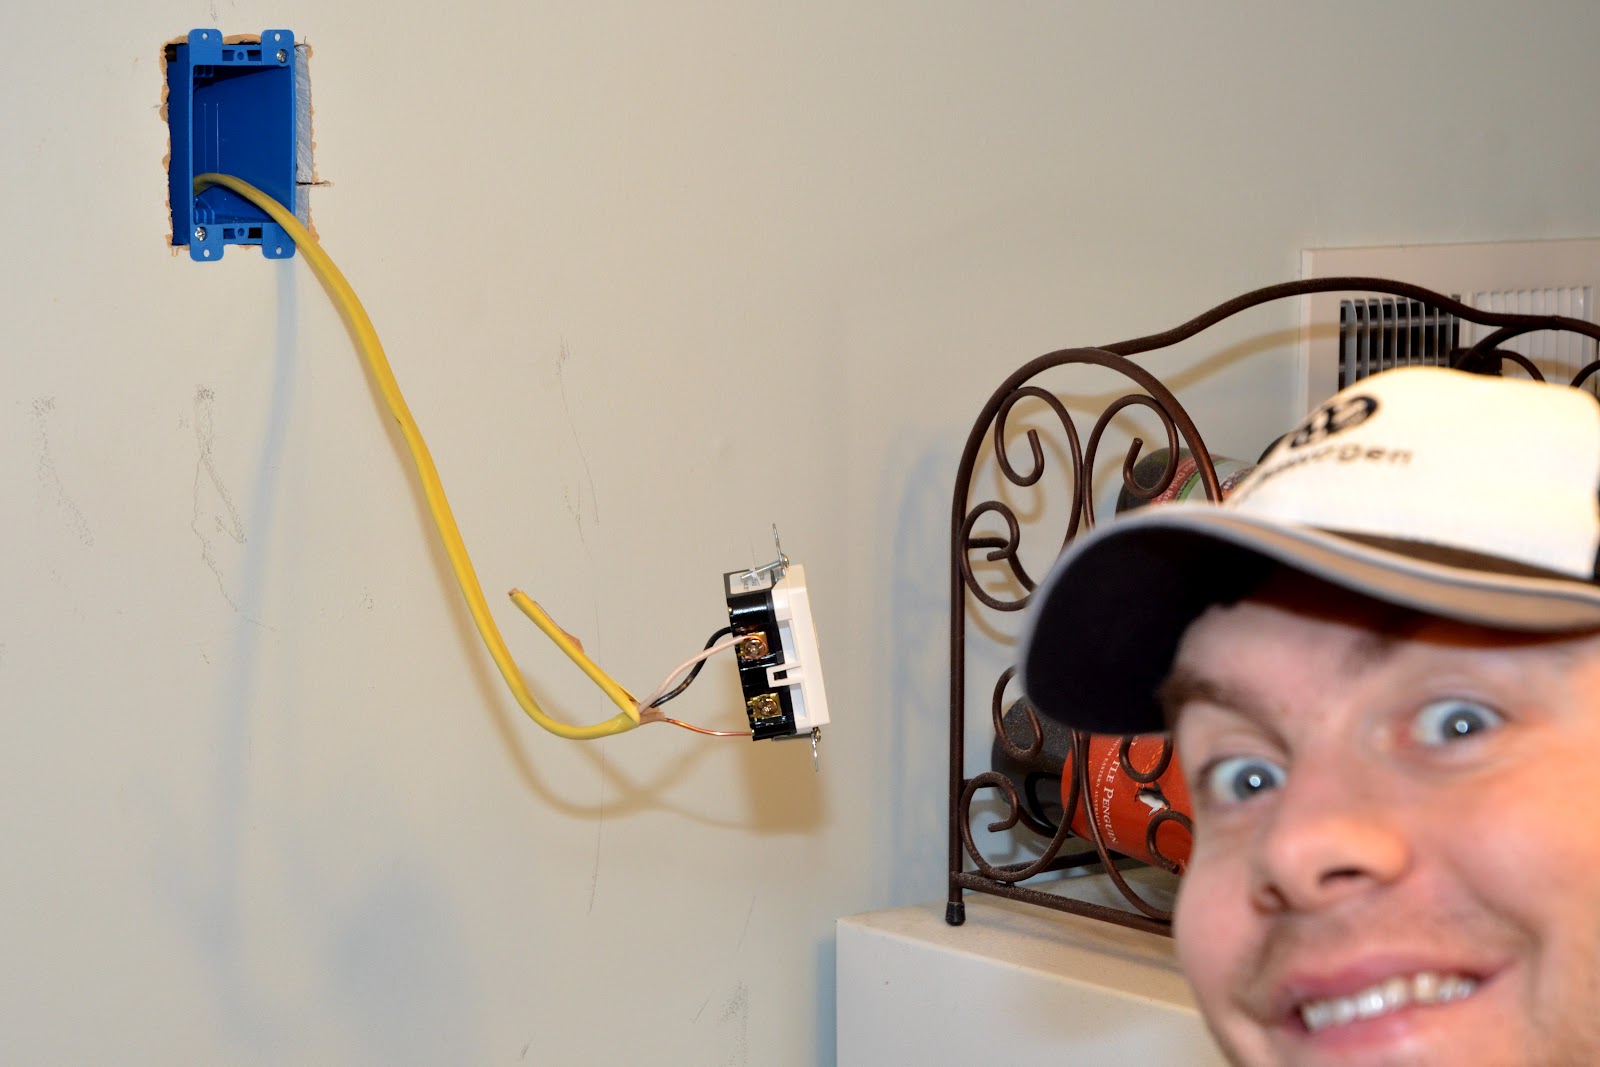
Now, a little teaser for the E&C Super Bowl Project 2012:
It's going to involve a little electrical work, some heavy lifting, and hopefully a bag of popcorn in the end.


Like all of our best house projects, this one isn't completely thought through yet. But it's going to be fun!

More to come soon!

What have you guys been up to this weekend? Any antsy house-project people out there? Were you happy for the Giant's win?! (You can see E's favorite game-time food, lil smokies, on the stove.)

Follow @ Instagram

Back to Top